1、什么是spring应用上下文?
接口org.springframework.context.ApplicationContext表示spring上下文,下面2个实现类
1
2
org.springframework.context.support.ClassPathXmlApplicationContext org.springframework.context.annotation.AnnotationConfigApplicationContext
2、应用上文生命周期(14个阶段)
1、创建spring应用上下文
2、上下文启动准备阶段
3、BeanFactory创建阶段
4、BeanFactory准备阶段
5、BeanFactory后置处理阶段
6、BeanFactory注册BeanPostProcessor阶段
7、初始化内建Bean:MessageSource
8、初始化内建Bean:Spring事件广播器
9、Spring应用上下文刷新阶段
10、Spring事件监听器注册阶段
11、单例bean实例化阶段
12、BeanFactory初始化完成阶段
13、Spring应用上下文启动完成阶段
14、Spring应用上下文关闭阶段
3、Spring应用上下文的使用
看下这段代码,是不是很熟悉,这就是spring上下文最常见的用法。
1
2
3
4
5
6
7
8
9
10
11
12
13
14
@Configuration @ComponentScan public class MainConfig public static void main (String[] args) AnnotationConfigApplicationContext configApplicationContext = new AnnotationConfigApplicationContext(); configApplicationContext.register(MainConfig.class); configApplicationContext.refresh(); System.out.println("stop ok!" ); } }
4、阶段1:创建Spring应用上下文
对应这段代码
1 AnnotationConfigApplicationContext configApplicationContext = new AnnotationConfigApplicationContext();
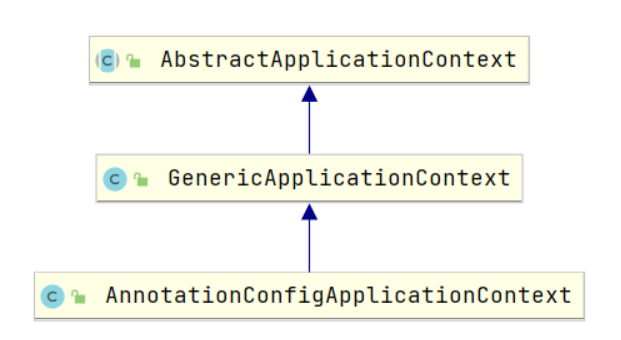
看一下其类图,这里主要列出了AnnotationConfigApplicationContext2个父类
当调用子类的构造器的时候,默认会自动先调用父类的构造器,先来看一下GenericApplicationContext构造器源码,如下,将beanFactory创建好了。
1
2
3
public GenericApplicationContext () this .beanFactory = new DefaultListableBeanFactory(); }
再来看看AnnotationConfigApplicationContext构造器源码,如下:
1
2
3
4
5
6
public AnnotationConfigApplicationContext () this .reader = new AnnotatedBeanDefinitionReader(this ); this .scanner = new ClassPathBeanDefinitionScanner(this ); }
@1:new AnnotatedBeanDefinitionReader(this),进入这个方法内部,最终会走到下面这个方法,非常关键的一个方法,会向spring容器中注册5个关键的bean,这几个bean都是非常很重要的。
1
2
3
4
5
6
7
8
9
10
11
12
13
14
15
16
17
18
19
20
21
22
23
24
25
26
27
28
29
30
31
32
33
34
35
36
37
38
39
40
41
42
43
44
45
org.springframework.context.annotation.AnnotationConfigUtils#registerAnnotationConfigProcessors(org.springframework.beans.factory.support.BeanDefinitionRegistry, java.lang.Object) public static Set<BeanDefinitionHolder> registerAnnotationConfigProcessors ( BeanDefinitionRegistry registry, @Nullable Object source) Set<BeanDefinitionHolder> beanDefs = new LinkedHashSet<>(8 ); if (!registry.containsBeanDefinition(CONFIGURATION_ANNOTATION_PROCESSOR_BEAN_NAME)) { RootBeanDefinition def = new RootBeanDefinition(ConfigurationClassPostProcessor.class); def.setSource(source); beanDefs.add(registerPostProcessor(registry, def, CONFIGURATION_ANNOTATION_PROCESSOR_BEAN_NAME)); } if (!registry.containsBeanDefinition(AUTOWIRED_ANNOTATION_PROCESSOR_BEAN_NAME)) { RootBeanDefinition def = new RootBeanDefinition(AutowiredAnnotationBeanPostProcessor.class); def.setSource(source); beanDefs.add(registerPostProcessor(registry, def, AUTOWIRED_ANNOTATION_PROCESSOR_BEAN_NAME)); } if (jsr250Present && !registry.containsBeanDefinition(COMMON_ANNOTATION_PROCESSOR_BEAN_NAME)) { RootBeanDefinition def = new RootBeanDefinition(CommonAnnotationBeanPostProcessor.class); def.setSource(source); beanDefs.add(registerPostProcessor(registry, def, COMMON_ANNOTATION_PROCESSOR_BEAN_NAME)); } if (!registry.containsBeanDefinition(EVENT_LISTENER_PROCESSOR_BEAN_NAME)) { RootBeanDefinition def = new RootBeanDefinition(EventListenerMethodProcessor.class); def.setSource(source); beanDefs.add(registerPostProcessor(registry, def, EVENT_LISTENER_PROCESSOR_BEAN_NAME)); } if (!registry.containsBeanDefinition(EVENT_LISTENER_FACTORY_BEAN_NAME)) { RootBeanDefinition def = new RootBeanDefinition(DefaultEventListenerFactory.class); def.setSource(source); beanDefs.add(registerPostProcessor(registry, def, EVENT_LISTENER_FACTORY_BEAN_NAME)); } return beanDefs; }
再来捋一下上面这段代码,主要向spring容器中注册了5个关键的bean:
1、ConfigurationClassPostProcessor :这是个非常关键的类,建议去看一下他的源码,基本上我们自定义的bean都是通过这个类注册的,下面这些注解都是在这个类中处理的
1
2
3
4
5
6
7
8
9
@Configuration @Component @PropertySource @PropertySources @ComponentScan @ComponentScans @Import @ImportResource @Bean
2、AutowiredAnnotationBeanPostProcessor :负责处理@Autowire注解
3、注册CommonAnnotationBeanPostProcessor :负责处理@Resource注解
4、注册EventListenerMethodProcessor :负责处理@EventListener标注的方法,即事件处理器
5、注册DefaultEventListenerFactory :负责将@EventListener标注的方法包装为ApplicationListener对象
4、阶段2~阶段13
阶段2到阶段13,这中间的12个阶段都位于refresh方法中,所以refresh方法非常很重要,需要多花时间研究这个方法。
refresh方法源码如下:
1
2
3
4
5
6
7
8
9
10
11
12
13
14
15
16
17
18
19
20
21
22
23
24
25
26
27
28
29
30
31
32
33
34
35
36
37
38
39
40
41
42
org.springframework.context.support.AbstractApplicationContext#refresh @Override public void refresh () throws BeansException, IllegalStateException prepareRefresh(); ConfigurableListableBeanFactory beanFactory = obtainFreshBeanFactory(); prepareBeanFactory(beanFactory); try { postProcessBeanFactory(beanFactory); invokeBeanFactoryPostProcessors(beanFactory); registerBeanPostProcessors(beanFactory); initMessageSource(); initApplicationEventMulticaster(); onRefresh(); registerListeners(); finishBeanFactoryInitialization(beanFactory); finishRefresh(); } }
阶段2:Spring应用上下文启动准备阶段
1
2
3
4
5
6
7
8
9
10
11
12
13
14
15
16
17
18
19
20
21
22
23
24
25
26
27
protected void prepareRefresh () this .startupDate = System.currentTimeMillis(); this .closed.set(false ); this .active.set(true ); initPropertySources(); getEnvironment().validateRequiredProperties(); if (this .earlyApplicationListeners == null ) { this .earlyApplicationListeners = new LinkedHashSet<>(this .applicationListeners); } else { this .applicationListeners.clear(); this .applicationListeners.addAll(this .earlyApplicationListeners); } this .earlyApplicationEvents = new LinkedHashSet<>(); }
这里说一下什么是早期事件?什么是早期的事件监听器呢?
当使用spring上下文发布事件的时候,如下代码
1 applicationContext.publishEvent(事件对象)
其内部最终会用到AbstractApplicationContext下面这个属性来发布事件,但是可能此时applicationEventMulticaster还没有创建好,是空对象,所以此时是无法广播事件的,那么此时发布的事件就是早期的事件,就会被放在this.earlyApplicationEvents中暂时存放着,当时间广播器applicationEventMulticaster创建好了之后,才会会将早期的事件广播出去
1 private ApplicationEventMulticaster applicationEventMulticaster;
同理,当applicationEventMulticaster还未准备好的时候,调用下面下面代码向spring上下文中添加事件监听器的时候,这时放进去的监听器就是早期的事件监听器。
1 applicationContext.addApplicationListener(事件监听器对象)
说了这么多,理解起来很简单,就是当事件广播器applicationEventMulticaster还未准备好的时候,此时向上下文中添加的事件就是早期的事件,会被放到this.earlyApplicationEvents中,此时这个事件暂时没办法广播。
阶段3:BeanFactory创建阶段
这个阶段负责将BeanFactory创建好,返回给spring应用上下文
1 ConfigurableListableBeanFactory beanFactory = obtainFreshBeanFactory();
obtainFreshBeanFactory源码:
1
2
3
4
5
6
protected ConfigurableListableBeanFactory obtainFreshBeanFactory () refreshBeanFactory(); return getBeanFactory(); }
阶段4:BeanFactory准备阶段
1 prepareBeanFactory(beanFactory);
源码如下
1
2
3
4
5
6
7
8
9
10
11
12
13
14
15
16
17
18
19
20
21
22
23
24
25
26
27
28
29
30
31
32
33
34
35
36
37
38
39
40
protected void prepareBeanFactory (ConfigurableListableBeanFactory beanFactory) beanFactory.setBeanClassLoader(getClassLoader()); beanFactory.setBeanExpressionResolver(new StandardBeanExpressionResolver(beanFactory.getBeanClassLoader())); beanFactory.addPropertyEditorRegistrar(new ResourceEditorRegistrar(this , getEnvironment())); beanFactory.addBeanPostProcessor(new ApplicationContextAwareProcessor(this )); beanFactory.ignoreDependencyInterface(EnvironmentAware.class); beanFactory.ignoreDependencyInterface(EmbeddedValueResolverAware.class); beanFactory.ignoreDependencyInterface(ResourceLoaderAware.class); beanFactory.ignoreDependencyInterface(ApplicationEventPublisherAware.class); beanFactory.ignoreDependencyInterface(MessageSourceAware.class); beanFactory.ignoreDependencyInterface(ApplicationContextAware.class); beanFactory.registerResolvableDependency(BeanFactory.class, beanFactory); beanFactory.registerResolvableDependency(ResourceLoader.class, this ); beanFactory.registerResolvableDependency(ApplicationEventPublisher.class, this ); beanFactory.registerResolvableDependency(ApplicationContext.class, this ); beanFactory.addBeanPostProcessor(new ApplicationListenerDetector(this )); if (!beanFactory.containsLocalBean(ENVIRONMENT_BEAN_NAME)) { beanFactory.registerSingleton(ENVIRONMENT_BEAN_NAME, getEnvironment()); } if (!beanFactory.containsLocalBean(SYSTEM_PROPERTIES_BEAN_NAME)) { beanFactory.registerSingleton(SYSTEM_PROPERTIES_BEAN_NAME, getEnvironment().getSystemProperties()); } if (!beanFactory.containsLocalBean(SYSTEM_ENVIRONMENT_BEAN_NAME)) { beanFactory.registerSingleton(SYSTEM_ENVIRONMENT_BEAN_NAME, getEnvironment().getSystemEnvironment()); } }
先来看看@1的代码
1 beanFactory.addBeanPostProcessor(new ApplicationContextAwareProcessor(this ));
向spring容器中注入了一个ApplicationContextAwareProcessor,这是一个BeanPostProcessor(Bean处理器),这个接口中定义了很多方法,会在bean创建的不同阶段被调用,常用来扩展bean的创建过程。想升入了解的朋友,可以先去看一下这篇文章:Bean生命周期 。
在回到ApplicationContextAwareProcessor这个接口上来,看一下其的源码,大家就知道是干什么的,如下,当我们的bean实现了Aware这样的接口的时候,接口中的方法会被回调,用来在自定义的bean中注入spring上下文中的一些对象,比如我们在我们的bean中用到Environment,那么只需实现EnvironmentAware接口,那么Environment会被自动注入进去
1
2
3
4
5
6
7
8
9
10
11
12
13
14
15
16
17
18
if (bean instanceof EnvironmentAware) { ((EnvironmentAware) bean).setEnvironment(this .applicationContext.getEnvironment()); } if (bean instanceof EmbeddedValueResolverAware) { ((EmbeddedValueResolverAware) bean).setEmbeddedValueResolver(this .embeddedValueResolver); } if (bean instanceof ResourceLoaderAware) { ((ResourceLoaderAware) bean).setResourceLoader(this .applicationContext); } if (bean instanceof ApplicationEventPublisherAware) { ((ApplicationEventPublisherAware) bean).setApplicationEventPublisher(this .applicationContext); } if (bean instanceof MessageSourceAware) { ((MessageSourceAware) bean).setMessageSource(this .applicationContext); } if (bean instanceof ApplicationContextAware) { ((ApplicationContextAware) bean).setApplicationContext(this .applicationContext); }
再来看看**@3**的代码
1
2
3
4
beanFactory.registerResolvableDependency(BeanFactory.class, beanFactory); beanFactory.registerResolvableDependency(ResourceLoader.class, this ); beanFactory.registerResolvableDependency(ApplicationEventPublisher.class, this ); beanFactory.registerResolvableDependency(ApplicationContext.class, this );
这个用来向spring容器中添加依赖查找的对象,上面代码的第1行是添加了BeanFactory,当我们的bean中想用到BeanFactory的时候,只需要按照下面这么写,那么就会被自动注入,即使因为上面第1行代码将BeanFactory添加到依赖查找列表中了
1
2
@Autowire private BeanFactory beanFactory;
再来看看@4的代码
1 beanFactory.addBeanPostProcessor(new ApplicationListenerDetector(this ));
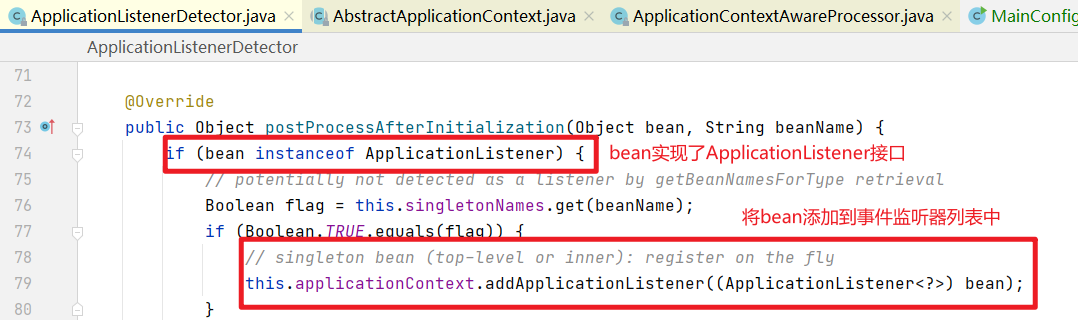
ApplicationListenerDetector也是一个BeanPostProcessor,这个类是用于处理自定义的事件监听器的。
当我们的bean实现了ApplicationListener接口,是一个事件监听器的时候,那么这个bean创建的过程中将会被ApplicationListenerDetector处理,会将我们这个bean添加到spring上下文容器的事件监听器列表中。
再来看看@5的代码
1
2
3
if (!beanFactory.containsLocalBean(ENVIRONMENT_BEAN_NAME)) { beanFactory.registerSingleton(ENVIRONMENT_BEAN_NAME, getEnvironment()); }
将Environment作为单例注册到spring容器单例列表中,对应的bena名称是environment,当我们的bean中需要用到Environment的时候,可以使用下面的写法,此时spring容器创建bean的过程中,就会从单例的bean列表中找到Environment,将其注入到下面的属性中。
1
2
@Autowire private Environment environment
我们还可以通过environment名称从spring容器中查找到Environment对象,如下:
1 applicationContext.getBean("environment" , Environment.class)
再来看看@6、@7代码
这个同@5的代码,这里说一下
1
2
getEnvironment().getSystemProperties() -- 对应 --> System.getProperties() getEnvironment().getSystemEnvironment() -- 对应 --> System.getenv()
这里说一下System.getProperties()、System.getenv()这两个是干嘛的。
下面这个命令大家都用过吧,大家主要看一下-D,这个可以设置一些启动参数,-D后面跟的这些参数,会被放在System.getProperties()中了。
System.getenv()用来获取环境变量信息的。
阶段5:BeanFactory后置处理阶段(AbstractApplicationContext#postProcessBeanFactory提供)
1 postProcessBeanFactory(beanFactory);
这个方法留给子类实现的,此时beanFactory已经创建好了,但是容器中的bean还没有被实例化,子类可以实现这个方法,可以对BeanFactory做一些特殊的配置,比如可以添加一些自定义BeanPostProcessor等等,主要是留给子类去扩展的。
阶段6:调用BeanFactoryPostProcessor扩展点阶段
1 invokeBeanFactoryPostProcessors(beanFactory);
调用BeanDefinitionRegistryPostProcessor、BeanFactoryPostProcessor两个接口的实现类
建议一定要先看一下这篇文章:Spring系列第29篇:BeanFactory扩展(BeanFactoryPostProcessor、BeanDefinitionRegistryPostProcessor)
这个阶段主要就是从spring容器中找到BeanFactoryPostProcessor接口的所有实现类,然后调用,完成所有bean注册的功能,注意是bean注册,即将bean的定义信息转换为BeanDefinition对象,然后注册到spring容器中,此时bean还未被实例化,下面继续。
大家再回头看一下阶段1,阶段1在spring容器中注册了一个非常关键的bean:ConfigurationClassPostProcessor,代码如下
1
2
3
4
5
if (!registry.containsBeanDefinition(CONFIGURATION_ANNOTATION_PROCESSOR_BEAN_NAME)) { RootBeanDefinition def = new RootBeanDefinition(ConfigurationClassPostProcessor.class); def.setSource(source); beanDefs.add(registerPostProcessor(registry, def, CONFIGURATION_ANNOTATION_PROCESSOR_BEAN_NAME)); }
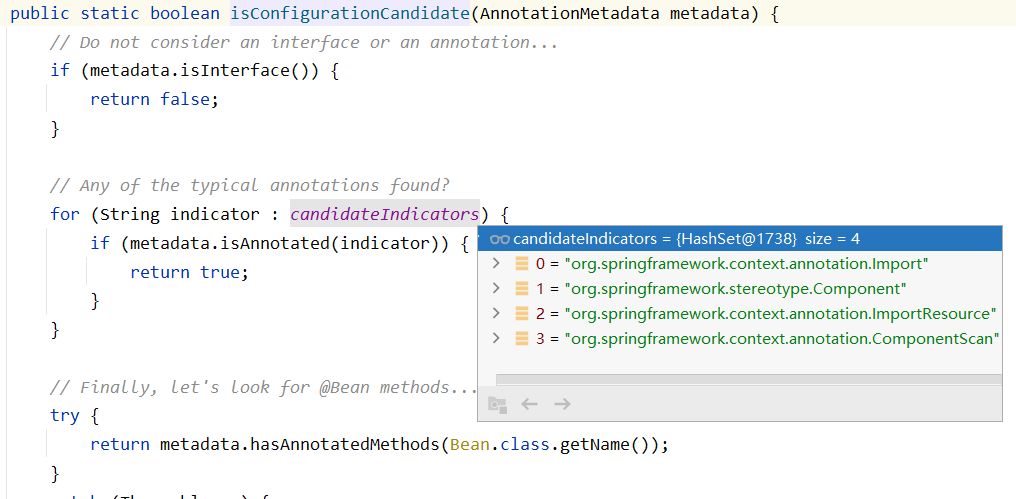
ConfigurationClassPostProcessor就实现了BeanFactoryPostProcessor接口,所以ConfigurationClassPostProcessor会在阶段6中被调用,下面这些注解都是在这个类中处理的,所以想研究下面这些注解原理的,直接看去看ConfigurationClassPostProcessor的源码,非常关键重要的一个类,研究spring源码,此类必看
1
2
3
4
5
6
7
8
9
@Configuration @Component @PropertySource @PropertySources @ComponentScan @ComponentScans @Import @ImportResource @Bean
1.processConfigBeanDefinitions()前半段
1
2
3
4
5
6
7
8
9
10
11
12
13
14
15
16
17
18
19
20
21
22
23
24
25
26
27
28
29
30
31
32
33
public void processConfigBeanDefinitions (BeanDefinitionRegistry registry) List<BeanDefinitionHolder> configCandidates = new ArrayList<>(); String[] candidateNames = registry.getBeanDefinitionNames(); for (String beanName : candidateNames) { BeanDefinition beanDef = registry.getBeanDefinition(beanName); if (beanDef.getAttribute(ConfigurationClassUtils.CONFIGURATION_CLASS_ATTRIBUTE) != null ) { if (logger.isDebugEnabled()) { logger.debug("Bean definition has already been processed as a configuration class: " + beanDef); } } else if (ConfigurationClassUtils.checkConfigurationClassCandidate(beanDef, this .metadataReaderFactory)) { configCandidates.add(new BeanDefinitionHolder(beanDef, beanName)); } } if (configCandidates.isEmpty()) { return ; } ... } Map<String, Object> config = metadata.getAnnotationAttributes(Configuration.class.getName()); if (config != null && !Boolean.FALSE.equals(config.get("proxyBeanMethods" ))) { beanDef.setAttribute(CONFIGURATION_CLASS_ATTRIBUTE, CONFIGURATION_CLASS_FULL); } else if (config != null || isConfigurationCandidate(metadata)) { beanDef.setAttribute(CONFIGURATION_CLASS_ATTRIBUTE, CONFIGURATION_CLASS_LITE); }
2.processConfigBeanDefinitions()后半段
1 2 3 4 5 6 7 8 9 10 11 12 13 14 15 16 17 18 19 20 21 22 23 24 25 26 27 28 29 30 31 32 33 34 35 36 37 38 39 40 41 42 43 44 45 46 47 48 ConfigurationClassParser parser = new ConfigurationClassParser( this .metadataReaderFactory, this .problemReporter, this .environment, this .resourceLoader, this .componentScanBeanNameGenerator, registry); Set<BeanDefinitionHolder> candidates = new LinkedHashSet<>(configCandidates); Set<ConfigurationClass> alreadyParsed = new HashSet<>(configCandidates.size()); do { parser.parse(candidates); parser.validate(); Set<ConfigurationClass> configClasses = new LinkedHashSet<>(parser.getConfigurationClasses()); configClasses.removeAll(alreadyParsed); if (this .reader == null ) { this .reader = new ConfigurationClassBeanDefinitionReader( registry, this .sourceExtractor, this .resourceLoader, this .environment, this .importBeanNameGenerator, parser.getImportRegistry()); } this .reader.loadBeanDefinitions(configClasses); alreadyParsed.addAll(configClasses); candidates.clear(); if (registry.getBeanDefinitionCount() > candidateNames.length) { String[] newCandidateNames = registry.getBeanDefinitionNames(); Set<String> oldCandidateNames = new HashSet<>(Arrays.asList(candidateNames)); Set<String> alreadyParsedClasses = new HashSet<>(); for (ConfigurationClass configurationClass : alreadyParsed) { alreadyParsedClasses.add(configurationClass.getMetadata().getClassName()); } for (String candidateName : newCandidateNames) { if (!oldCandidateNames.contains(candidateName)) { BeanDefinition bd = registry.getBeanDefinition(candidateName); if (ConfigurationClassUtils.checkConfigurationClassCandidate(bd, this .metadataReaderFactory) && !alreadyParsedClasses.contains(bd.getBeanClassName())) { candidates.add(new BeanDefinitionHolder(bd, candidateName)); } } } candidateNames = newCandidateNames; } } while (!candidates.isEmpty());
1 2 3 4 5 6 ConfigurationClassParser#parse(Set<BeanDefinitionHolder>); ConfigurationClassParser#parse(AnnotationMetadata metadata, String beanName); ConfigurationClassParser#processConfigurationClass(ConfigurationClass, Predicate<String>); ConfigurationClassParser#doProcessConfigurationClass(ConfigurationClass, SourceClass, Predicate<String>); //处理前面所说的@Component、@PropertySources、@ComponentScans、@ComponentScan、@Import、@ImportResource、@Bean等注解
3.postProcessBeanFactory
主要是给@Configuration配置类产生cglib代理,并添加了一个ImportAwareBeanPostProcessor后置处理器
通常,阶段6执行完毕之后,我们所有自定义的bean都已经被注册到spring容器中了,被转换为BeanDefinition丢到BeanFactory中了,此时bean还未被实例化。
阶段7:注册BeanPostProcessor
1 registerBeanPostProcessors(beanFactory);
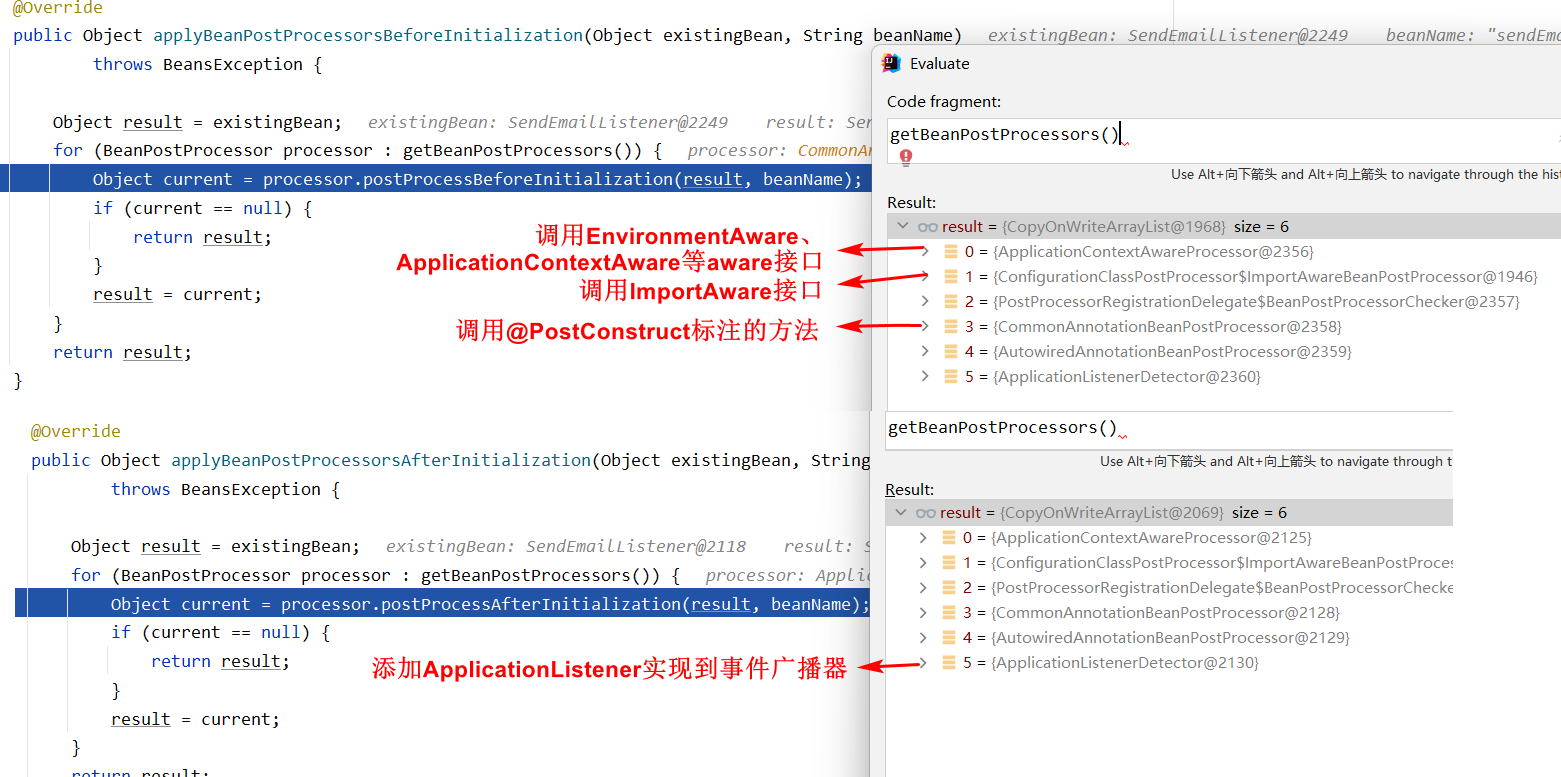
注册BeanPostProcessor,这个阶段会遍历spring容器bean定义列表,把所有实现了BeanPostProcessor 接口的bean拿出来,然后将他们添加到spring容器的BeanPostProcessor列表中。
BeanPostProcessor是bean后置处理器,其内部提供了很多方法,用来对bean创建的过程进行扩展的。
阶段8:初始化内建Bean:MessageSource
MessageSource 是用来处理国际化的,这个阶段会将MessageSource创建好,如果想扩展或者实现国家化的,可以看看这个方法的源码。
关于国际化的可以看这篇文章:Spring系列第26篇:国际化详解
阶段9:初始化内建Bean:Spring事件广播器
1 initApplicationEventMulticaster();
ApplicationEventMulticaster是事件广播器,用来广播事件的,这个阶段会将ApplicationEventMulticaster创建好,如果想自定义事件广播器的,可以看看这个方法的源码,关于spring事件的使用,看这里:Spring系列第27篇:spring事件机制详解 。
阶段10:Spring应用上下文刷新阶段,由子类实现
用来初始化其他特殊的bean,由子类去实现。
阶段11:Spring事件监听器注册阶段
注册事件监听器到事件广播器中,看一下其源码,如下:
1
2
3
4
5
6
7
8
9
10
11
12
13
14
15
16
17
18
19
20
21
protected void registerListeners () for (ApplicationListener<?> listener : getApplicationListeners()) { getApplicationEventMulticaster().addApplicationListener(listener); } String[] listenerBeanNames = getBeanNamesForType(ApplicationListener.class, true , false ); for (String listenerBeanName : listenerBeanNames) { getApplicationEventMulticaster().addApplicationListenerBean(listenerBeanName); } Set<ApplicationEvent> earlyEventsToProcess = this .earlyApplicationEvents; this .earlyApplicationEvents = null ; if (earlyEventsToProcess != null ) { for (ApplicationEvent earlyEvent : earlyEventsToProcess) { getApplicationEventMulticaster().multicastEvent(earlyEvent); } } }
这里主要说一下@1 ,将上下文中的事件监听器添加到事件广播器中,看看下面源码就懂了
1
2
3
4
5
6
7
8
9
10
11
12
13
14
15
16
org.springframework.context.support.AbstractApplicationContext Set<ApplicationListener<?>> applicationListeners = new LinkedHashSet<>(); public Collection<ApplicationListener<?>> getApplicationListeners() { return this .applicationListeners; } @Override public void addApplicationListener (ApplicationListener<?> listener) Assert.notNull(listener, "ApplicationListener must not be null" ); if (this .applicationEventMulticaster != null ) { this .applicationEventMulticaster.addApplicationListener(listener); } this .applicationListeners.add(listener); }
再来看看@3,广播早期的事件,早期的时候,由于事件广播器this.applicationEventMulticaster还是空,所以事件被放在了this.earlyApplicationEvents这个集合中并没有广播,等到这个时候才广播早期的事件,所以用事件的时候,大家需要注意,如果你在阶段11之前,调用了下面方法发布事件,那么可能此时你看不到事件产生的效果
1 applicationContext.publishEvent(事件对象)
所以如果你的bean实现了下面这些接口,不建议再实现org.springframework.context.ApplicationListener接口,否则会让你莫名其妙的感觉。
1
2
org.springframework.beans.factory.config.BeanFactoryPostProcessor org.springframework.beans.factory.config.BeanPostProcessor
阶段12:实例化所有剩余的(非lazy init)单例
1 finishBeanFactoryInitialization(beanFactory);
这个方法中将实例化所有单例的bean(不包需要延迟实例化的bean) ,来看看其源码:
1
2
3
4
5
6
7
8
9
10
11
12
protected void finishBeanFactoryInitialization (ConfigurableListableBeanFactory beanFactory) if (!beanFactory.hasEmbeddedValueResolver()) { beanFactory.addEmbeddedValueResolver(strVal -> getEnvironment().resolvePlaceholders(strVal)); } beanFactory.freezeConfiguration(); beanFactory.preInstantiateSingletons(); }
重点看@1的代码,这里会调用beanFactory的preInstantiateSingletons()方法,进去看源码,源码位于DefaultListableBeanFactory这个类中,如下:
1
2
3
4
5
6
7
8
9
10
11
12
13
14
15
16
17
18
19
20
21
22
23
24
25
26
27
28
org.springframework.beans.factory.support.DefaultListableBeanFactory#preInstantiateSingletons public void preInstantiateSingletons () throws BeansException List<String> beanNames = new ArrayList<>(this .beanDefinitionNames); for (String beanName : beanNames) { } for (String beanName : beanNames) { Object singletonInstance = getSingleton(beanName); if (singletonInstance instanceof SmartInitializingSingleton) { SmartInitializingSingleton smartSingleton = (SmartInitializingSingleton) singletonInstance; if (System.getSecurityManager() != null ) { AccessController.doPrivileged((PrivilegedAction<Object>) () -> { smartSingleton.afterSingletonsInstantiated(); return null ; }, getAccessControlContext()); } else { smartSingleton.afterSingletonsInstantiated(); } } } }
上面这个方法主要做了2个事情:
1、完成所有单例bean的实例化:对应上面的代码@1,循环遍历beanNames列表,完成所有单例bean的实例化工作,这个循环完成之后,所有单例bean已经实例化完毕了,被放在spring容器缓存起来了。
2、回调SmartInitializingSingleton接口:对应上面的代码@2,此时所有的单例bean已经实例化好了,此时遍历所有单例bean,若bean实现了SmartInitializingSingleton接口,这个接口中有个afterSingletonsInstantiated方法,此时会回调这个方法,若我们想在所有单例bean创建完毕之后,做一些事情,可以实现这个接口。
实例化的主要几个工作:
Bean实例化阶段:会通过反射来调用bean的构造器来创建bean的实例
Bean属性赋值阶段:依赖注入,解析@Resource、@Autowired、@Value等注解
Bean初始化阶段:Aware接口回调、BeanPostProcessor接口回调
AOP入口
1
2
AbstractBeanFactory#doGetBean(String name, @Nullable Class<T> requiredType, @Nullable Object[] args, boolean typeCheckOnly); AbstractAutowireCapableBeanFactory#doCreateBean(String beanName, RootBeanDefinition mbd, @Nullable Object[] args)
BeanPostProcessor接口回调
阶段13:刷新完成阶段
进去看看其源码
1
2
3
4
5
6
7
8
9
10
11
12
13
protected void finishRefresh () clearResourceCaches(); initLifecycleProcessor(); getLifecycleProcessor().onRefresh(); publishEvent(new ContextRefreshedEvent(this )); }
先来看@2的代码
1 initLifecycleProcessor();
源码如下
1
2
3
4
5
6
7
8
9
10
11
12
13
14
15
16
17
18
19
protected void initLifecycleProcessor () ConfigurableListableBeanFactory beanFactory = getBeanFactory(); if (beanFactory.containsLocalBean("lifecycleProcessor" )) { this .lifecycleProcessor = beanFactory.getBean("lifecycleProcessor" , LifecycleProcessor.class); } else { DefaultLifecycleProcessor defaultProcessor = new DefaultLifecycleProcessor(); defaultProcessor.setBeanFactory(beanFactory); this .lifecycleProcessor = defaultProcessor; beanFactory.registerSingleton("lifecycleProcessor" , this .lifecycleProcessor); } }
再来看@3的代码
1 getLifecycleProcessor().onRefresh();
调用LifecycleProcessor的onRefresh方法, 这里要先说一下org.springframework.context.LifecycleProcessor这个接口,生命周期处理器,接口中定义了2个方法,而onClose方法会在上下文关闭中会被调用,稍后会看到
1
2
3
4
5
6
7
8
9
10
11
12
13
public interface LifecycleProcessor extends Lifecycle void onRefresh () void onClose () }
先来看看onRefresh方法,这个接口有个默认实现org.springframework.context.support.DefaultLifecycleProcessor,所以默认情况下,我们就看DefaultLifecycleProcessor中的onRefresh源码,如下
1
2
3
4
public void onRefresh () startBeans(true ); this .running = true ; }
进入startBeans(true)内部看看,如下,代码看起来可能有点绕,实际上很简单,就是从容器中找到所有实现org.springframework.context.Lifecycle接口的bean,然后调用他们的start方法。
1
2
3
4
5
6
7
8
9
10
11
12
13
14
15
16
17
18
19
20
21
22
private void startBeans (boolean autoStartupOnly) Map<String, Lifecycle> lifecycleBeans = getLifecycleBeans(); Map<Integer, LifecycleGroup> phases = new HashMap<>(); lifecycleBeans.forEach((beanName, bean) -> { if (!autoStartupOnly || (bean instanceof SmartLifecycle && ((SmartLifecycle) bean).isAutoStartup())) { int phase = getPhase(bean); LifecycleGroup group = phases.get(phase); if (group == null ) { group = new LifecycleGroup(phase, this .timeoutPerShutdownPhase, lifecycleBeans, autoStartupOnly); phases.put(phase, group); } group.add(beanName, bean); } }); if (!phases.isEmpty()) { List<Integer> keys = new ArrayList<>(phases.keySet()); Collections.sort(keys); for (Integer key : keys) { phases.get(key).start(); } } }
再来看@4的代码
1 publishEvent(new ContextRefreshedEvent(this ));
发布ContextRefreshedEvent事件,想在这个阶段做点事情的,可以监听这个事件。
小结下
这个阶段主要干了3个事情:
1、初始化当前上下文中的生命周期处理器LifecycleProcessor。
2、调用LifecycleProcessor.onRefresh()方法,若没有自定义LifecycleProcessor,那么会走DefaultLifecycleProcessor,其内部会调用spring容器中所有实现Lifecycle接口的bean的start方法。
3、发布ContextRefreshedEvent事件。
4、阶段14:Spring应用上下文关闭阶段
1 applicationContext.close()
最终会进入到doClouse()方法,代码如下
1
2
3
4
5
6
7
8
9
10
11
12
13
14
15
16
17
18
19
20
21
22
23
24
25
26
27
28
29
30
31
32
33
org.springframework.context.support.AbstractApplicationContext#doClose protected void doClose () if (this .active.get() && this .closed.compareAndSet(false , true )) { publishEvent(new ContextClosedEvent(this )); if (this .lifecycleProcessor != null ) { this .lifecycleProcessor.onClose(); } destroyBeans(); closeBeanFactory(); onClose(); if (this .earlyApplicationListeners != null ) { this .applicationListeners.clear(); this .applicationListeners.addAll(this .earlyApplicationListeners); } this .active.set(false ); } }
再来看@1的代码
1
2
3
if (this .lifecycleProcessor != null ) { this .lifecycleProcessor.onClose(); }
调用生命周期处理器的onClose方法,这里我们直接看DefaultLifecycleProcessor的onClose(),看看其源码,如下
1
2
3
4
5
public void onClose () stopBeans(); this .running = false ; }
stopBeans()源码如下,一大片,简单点理解:就是从容器中找到所有实现org.springframework.context.Lifecycle接口的bean,然后调用他们的stop()方法。
1
2
3
4
5
6
7
8
9
10
11
12
13
14
15
16
17
18
19
20
private void stopBeans () Map<String, Lifecycle> lifecycleBeans = getLifecycleBeans(); Map<Integer, LifecycleGroup> phases = new HashMap<>(); lifecycleBeans.forEach((beanName, bean) -> { int shutdownPhase = getPhase(bean); LifecycleGroup group = phases.get(shutdownPhase); if (group == null ) { group = new LifecycleGroup(shutdownPhase, this .timeoutPerShutdownPhase, lifecycleBeans, false ); phases.put(shutdownPhase, group); } group.add(beanName, bean); }); if (!phases.isEmpty()) { List<Integer> keys = new ArrayList<>(phases.keySet()); keys.sort(Collections.reverseOrder()); for (Integer key : keys) { phases.get(key).stop(); } } }
再来看@2的代码
销毁上下文的BeanFactory中所有缓存的单例bean,主要干2件事情:
1、调用bean的销毁方法
比如bean实现了org.springframework.beans.factory.DisposableBean接口,此时会被调用。还有bean中有些方法标注了@PreDestroy注解的,此时也会被调用。
2、将bean的信息从BeanFactory中清理掉
再来看@3的代码
源码如下,主要就是想当前spring应用上下文中的beanFactory属性还原。
1
2
3
4
5
6
7
8
9
10
11
org.springframework.context.support.AbstractRefreshableApplicationContext#closeBeanFactory @Override protected final void closeBeanFactory () synchronized (this .beanFactoryMonitor) { if (this .beanFactory != null ) { this .beanFactory.setSerializationId(null ); this .beanFactory = null ; } } }
5、总结
本文详细介绍了spring应用上下文的生命周期,建议大家结合源码多看几遍,同时有许多关键的实现类这里只是简单提了其作用,感兴趣的也可以多了解下他们的实现原理,平时闲的时候,也可以回头再看几遍,加深理解。
thumb_up
本文链接: http://lampkins.gitee.io/2022/02/10/Spring%E4%B8%8A%E4%B8%8B%E6%96%87%E7%94%9F%E5%91%BD%E5%91%A8%E6%9C%9F/